Do you have a raw video with lots of outtakes and mistakes? You don't want your audience to lose interest, so you need a video cutter that can trim the unnecessary bits and keep them engaged till the end.
But with so many video cutting software out there, it's natural to question if there's an online video cutter that's quick, effortless, and user-friendly.
Spoiler Alert: there is.
We've put in the hard work of trying out over 20 different tools (and editing more videos than we care to admit) to bring you the cream of the crop. Read on to learn about the six best video cutters for every type of user and their unique needs.
Jump to a specific review:
- VEED: best online video cutter for those looking for an intuitive end-to-end editor that works on both PC and Mac
- Online Video Cutter: best for those who only want to cut videos online and don’t need additional editing features
- Gihosoft Free Video Cutter: best for those who only want to cut videos offline and don’t need additional editing features
- Movavi: best for those who want a downloadable video editor that works on both PC and Mac
- Bandicut: best for those who want a downloadable video editor for PC
- iMovie: best for those who want a traditional video editor for Mac
Let’s get started.
1. VEED
VEED is a cloud-based online video editor that makes removing the unwanted parts of your video as easy as a few clicks. You can cut all video formats on the platform, including MP4, GIF, MOV, and AVI, as well as a range of audio files like WAVE, WAV, FLAC, and M4A.
Crop, rotate, loop, and edit while you’re at it to create quality and engaging videos for any platform, be it TikTok or YouTube. If you're short on time, VEED has a stunning collection of templates that can give your videos a professional look and feel, faster and sans the hard work.
VEED has a free plan which is great for one-off projects under 10 minutes. But if you’re looking to edit longer videos, you can sign up with a paid plan (starting at $24/mo).
.png)
How to Cut Videos with VEED
Here’s how you can use VEED to cut video online:
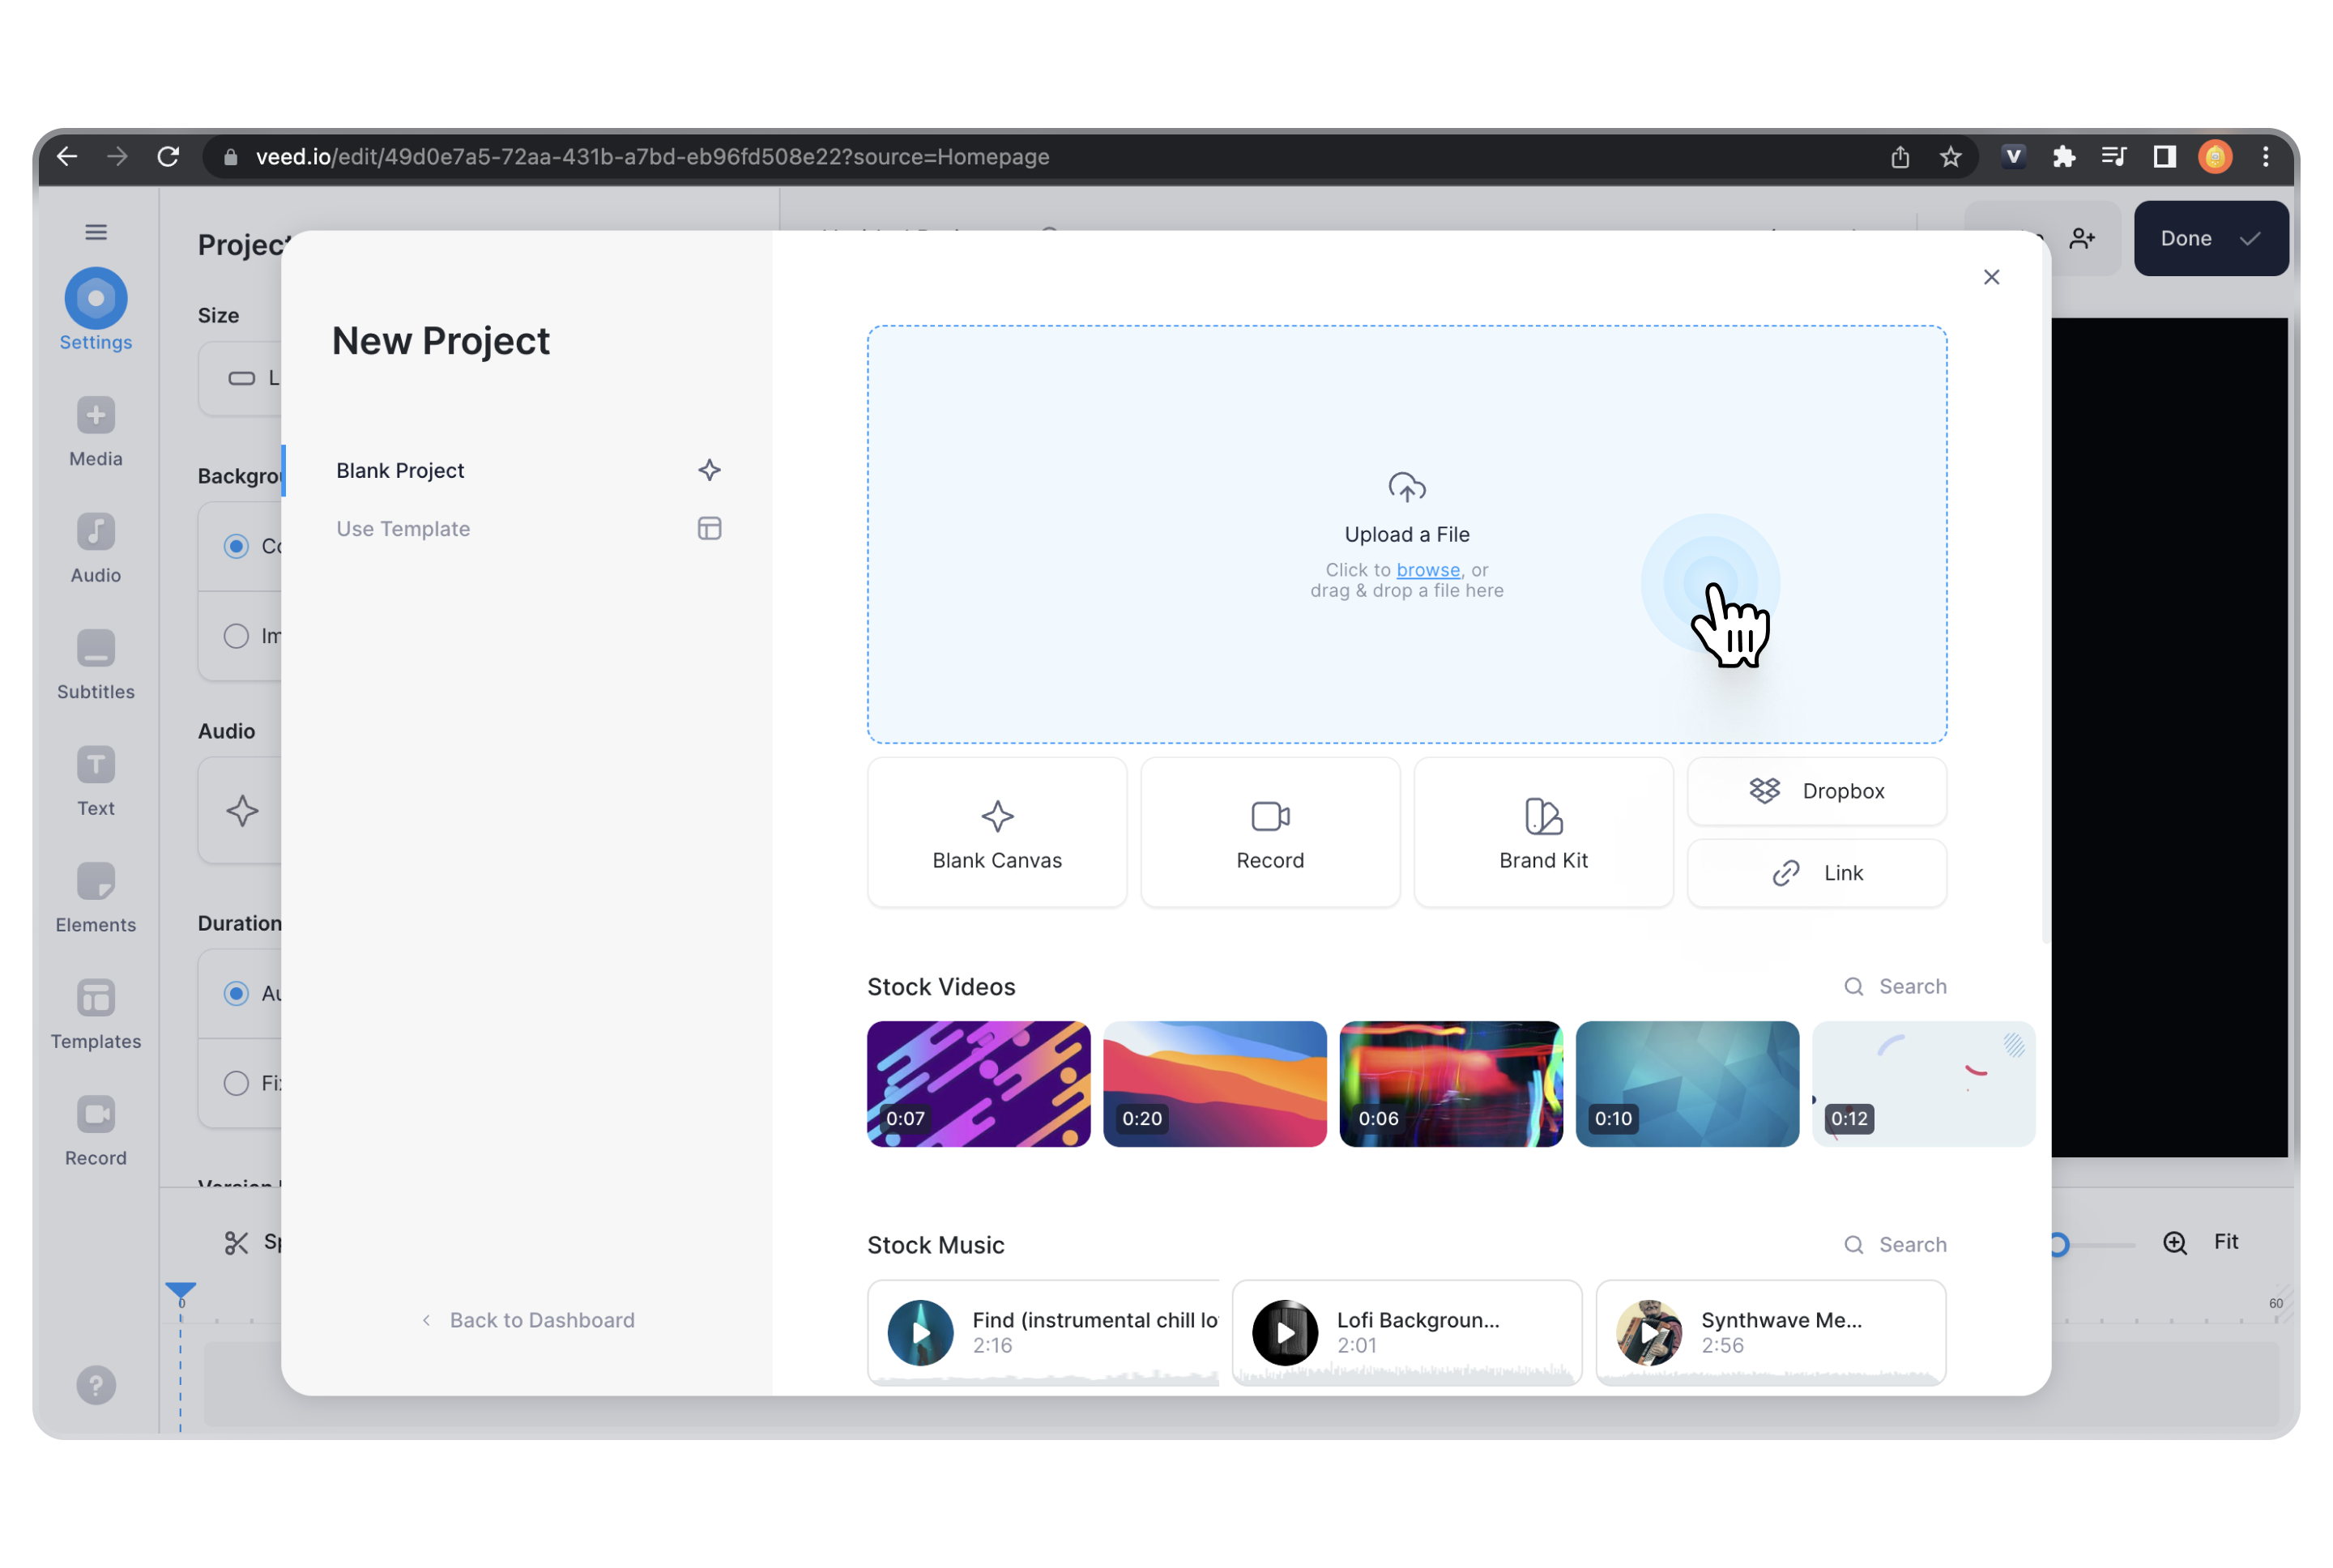
1. Sign up for your VEED account. No need to download the software, as the online video trimmer is cloud-based — just fire it up on your favorite browser and you’re good to go. If you already have an account, log into your VEED workspace.

2. Click Create Project at the top of your screen.

3. Upload the video you want to cut or trim from your system.

4. Click on the video in the timeline below.

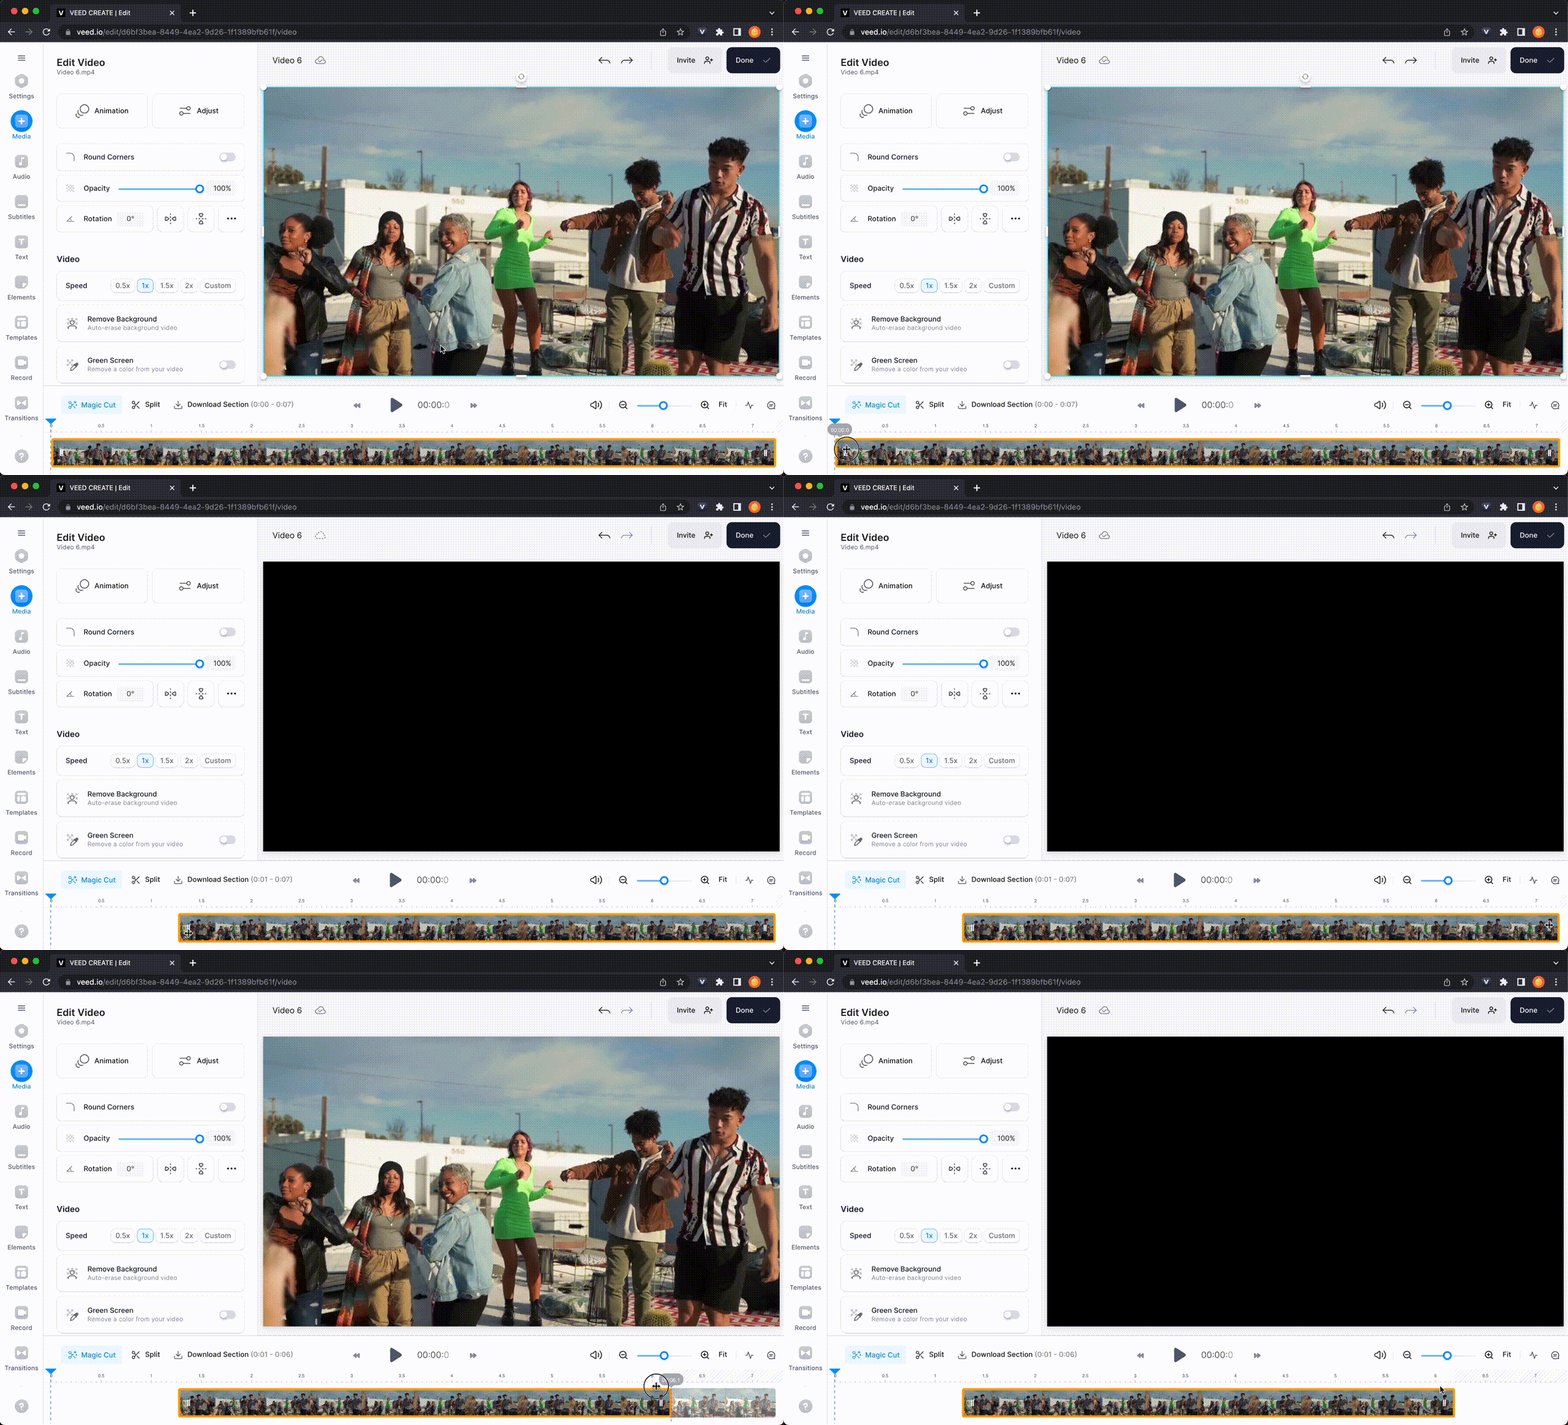
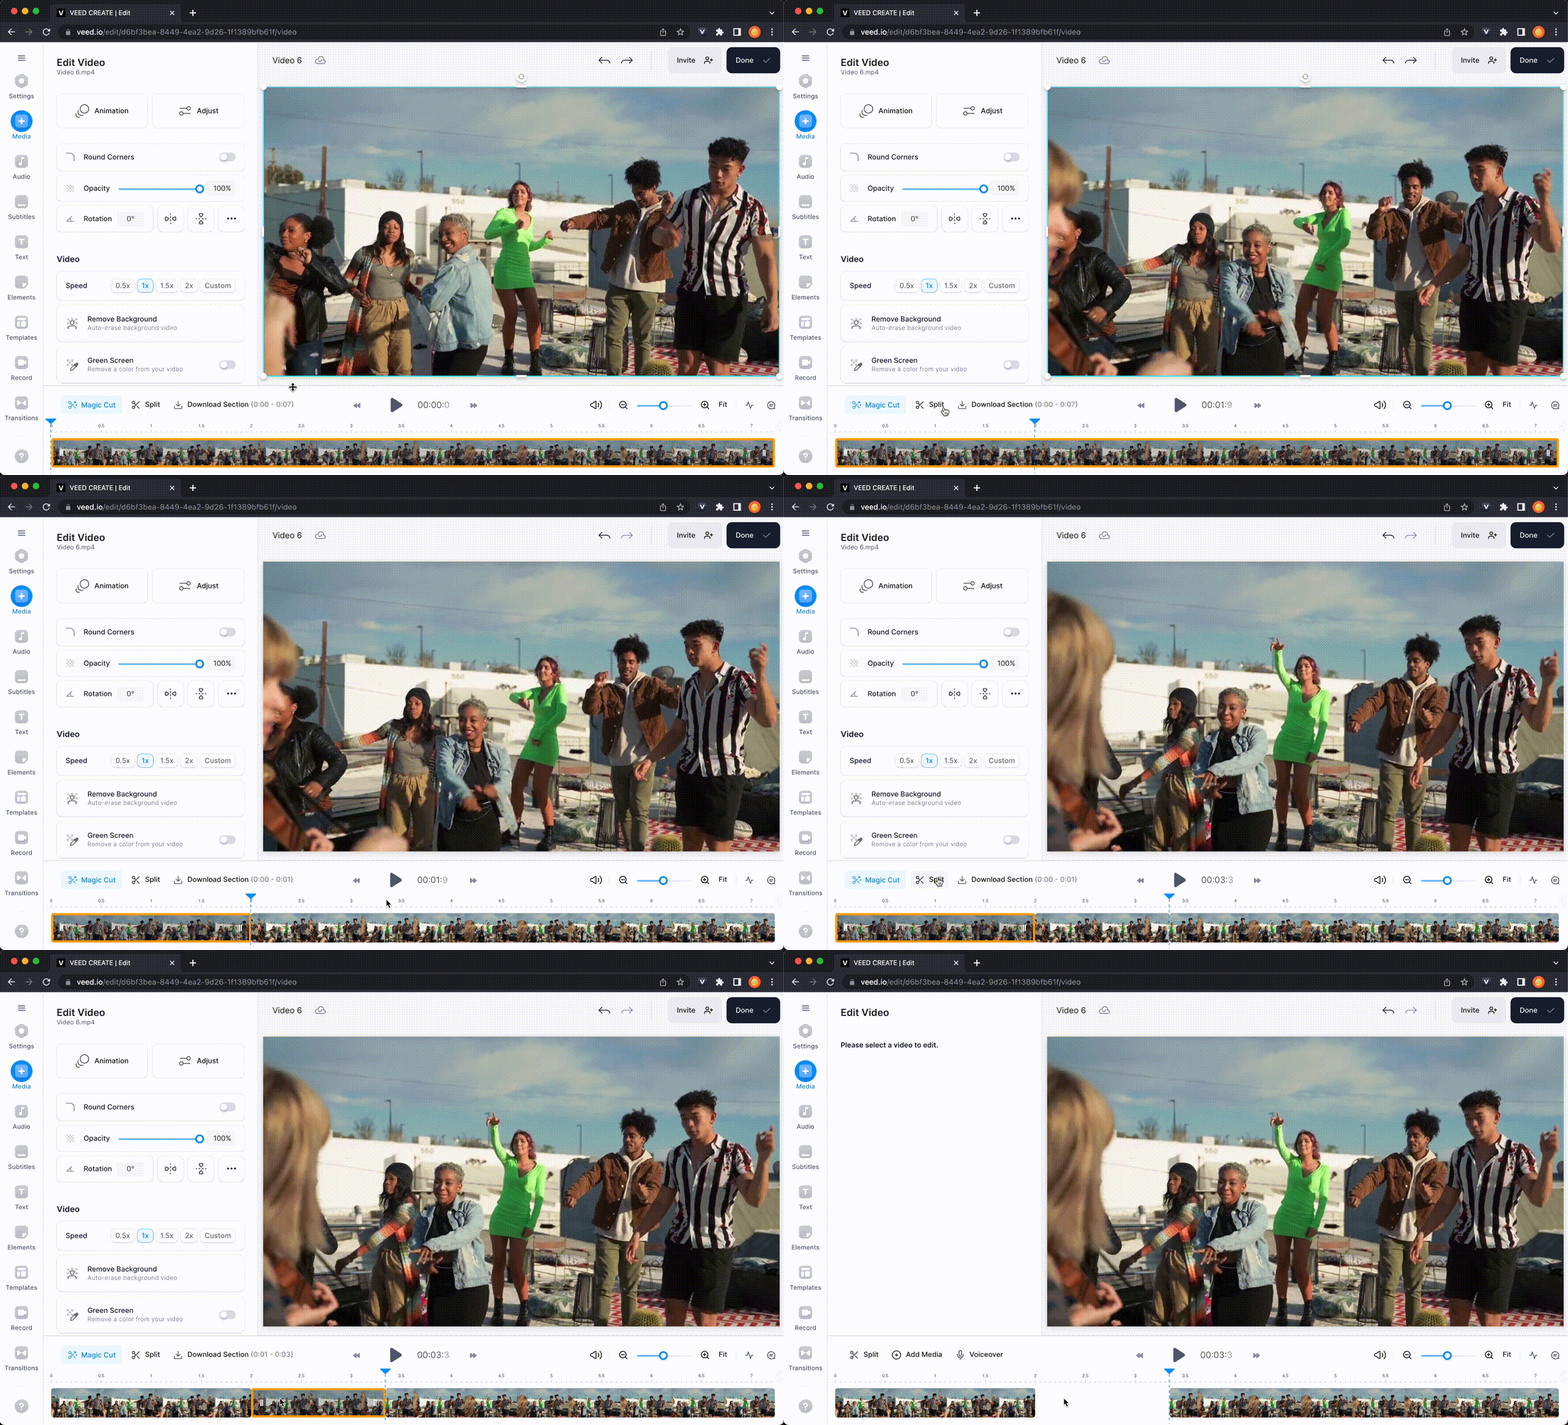
5. With VEED’s video trimmer and cutter, you can do a simple video cut in two ways:
👉 By dragging the ends of the orange slider on the timeline, as shown below:

👉 By splitting your video into multiple parts using Split Video and deleting the unwanted sections, as shown below:

6. (Optional) Continue editing your video if needed. Here are a few, extremely user-friendly yet powerful features worth trying:
- Auto subtitles: VEED automatically generates subtitles for your video that you can edit later.
- Clean audio: AI-powered tool that removes background noise from your audio and video—all at the click of a button.
- Stock music: add royalty-free music to your video for added pizzazz.
- Elements: have fun with engaging elements (think: emojis and stickers) to make your video more interactive.
- Transitions: select between different transition effects and styles to add between clips.
- Remove video background: don’t like your video’s original background? VEED’s online video background remover can replace it with any image or color you want.
7. When you’re happy with how your video looks, click Done.

8. Click Settings to select the quality of your video, followed by Export Video to download/share your trimmed clip.

VEED Pros and Cons
.png)
2. Online Video Editor
Need to trim down your video but don't want additional editing tools? You can try Online Video Editor, an easy-to-use web app that lets you clip small video files (up to 4 GB) right in your browser window.
It supports almost every video format out there, along with format-specific tools like GIF Cutter, Cut MKV, and Trim MPEG at your fingertips. Plus, thanks to the cropping and rotation features, you can customize the frame by zooming on a specific area and switch between portrait and landscape modes.
How to Cut Videos with Online Video Editor
Here’s how to trim your videos using Online Video Editor:
1. Open the Online Video Editor website.
2. Upload your video.
3. Drag the sliders on the timeline below to cut unnecessary sections.
4. (Optional) Crop, rotate, loop, and click the video, as well as change the video resolution, volume, and speed. You can also add text and images.
5. Click Save to download your video.
Online Video Editor Pros and Cons
3. Gihosoft Free Video Cutter
Gihosoft Free Video Cutter is designed with a clean and user-friendly interface, so you don't need to be an expert editor to use it. You can easily drag and drop your videos or import them directly into the program to start snipping away.
It supports all the popular video formats like MP4, WMV, MPG, and FLV, as well as audio formats like WMA, M4A, AIFF, and AAC.
Like the other options on our list, Gihosoft Free Video Cutter cuts video clips without original quality loss. You have precise control over every second of the video — set the start time and end time, and cut videos quickly at your will.
How to Cut Videos with Gihosoft Free Video Cutter
Let's start slicing some videos with the Gihosoft Free Video Cutter. Here's how to get started:
1. Download the Gihosoft Free Video Cutter app for Windows or iOS.
2. Import your video by clicking Add Files or drag and drop it.
3. Use the two blue sliders to set the start and end time of the clip you want to cut from the whole video.
4. Click Cut to start the cutting process.
4. Once you're happy with the video, click Save (the floppy disc-shaped icon). You can then select the format and choose the location to save your video.
5. Click OK.
Gihosoft Free Video Cutter Pros and Cons
4. Movavi
Movavi is a full-blown, traditional video editor with decent system specs that supports a variety of video formats like AVI, MKV, WMV, and MP4.
Using Movavi’s timeline markers, set the start and end times of the scenes you want to remove. And if you're feeling extra creative, add some text, captions, or callouts and tweak the colors. You can also use the Chroma key to swap the background for something more exotic or basic.
Movavi also offers pre-made intros and animations to spice up your videos. But if you want more, you can check out its Effects Store for extra eye candy like titles, transitions, stickers, and other professionally-designed graphics to enhance your content.
How to Cut Videos with Movavi
Here's how to use Movavi’s video trimmer:
1. Download Movavi Video Editor for Windows or iOS.
2. Open the Movavi workspace, and click Add Files to upload your video.
3. Adjust the Scale at the lower left of your screen to make video trimming easier.
4. Use the yellow slider to mark the start time of the part you want to remove.
5. Click Trim (the scissors icon) and indicate the end time of the part you want to remove. Repeat this as needed.
6. Your video will now be divided into different sections. To remove a section, right-click it and select Delete from the drop-down menu.
7. Once you're finished editing, click Export.
Movavi Pros and Cons
5. Bandicut
Bandicut is a straightforward video cutter for PC that makes video cutting simple and streamlined.
This Windows video editor app is super easy to use — all you need to do is specify the start and end times of the parts you want to remove. Thanks to the proprietary High-Speed Mode technology, you can snip and edit videos without sacrificing the original video quality. Even when you add special effects like time-lapse or slow motion.
Moreover, Bandicut's hardware acceleration feature means lightning-fast editing without weighing down your system. And with support for a range of file formats like MOV, AVI, ASF, and MP4, you can convert and upload your creations with ease.
How to Cut Videos with Bandicut
Follow the steps below to trim videos with Bandicut.
1. Download the Bandicut video cutter software.
2. Open the software, and click on Cut.
3. Browse and select the video you want to edit, and click Open.
4. Adjust the start and end points of the video segment you want to save, and then click Start.
5. Set the video output settings as you desire (High-Speed Mode allows for fast video cutting and merging without quality loss, while Encoding Mode lets you convert videos according to specific configurations).
6. Click Start.
Bandicut Pros and Cons
6. iMovie
Pre-installed on modern iOS devices, iMovie is often the convenient choice for iOS users looking to edit videos on the go.
While some users might find the video editing software a bit tricky to navigate initially, it's worth taking the time to get comfortable with it. Once you do, you can take advantage of its many features, including the ability to sync your work across all your Apple devices and a vast collection of templates and transitions.
If you're looking for even more advanced editing tools, you might want to consider upgrading to Final Cut Pro. This powerful software is a favorite among professional video editors and offers even more features and capabilities than iMovie.
How to Cut Videos with iMovie
Here are the steps to start cutting video files with iMovie:
1. Open iMovie on your iOS device.
2. Drag down the video you want to edit to the gray area below.
3. To cut out sections, navigate to the beginning of the segment you wish to cut out and click on it. A long line will appear on your screen — right-click it and select Split Clip.
4. Repeat Step 3, only this time indicating the ending of the segment you want to remove.
5. You’ll see the unneeded segment is now highlighted. Press Delete on your keyboard.
6. To trim the video, simply adjust the video sliders.
7. Repeat the steps as needed to get your desired output.
iMovie Pros and Cons
Best Video Cutters of 2023 (At a Glance)
Which Video Cutter is Right for Me?
To find the perfect video cutter for your needs, think about what you want. Whether you're looking to simply trim and cut your footage or require advanced editing capabilities, there's a tool out there that's right for you.
If you're after an all-in-one solution that can handle both basic and advanced video editing, VEED is definitely worth checking out. Our tool is versatile and user-friendly, making it a great choice for both beginners and experienced video editors alike.
If you're not sure whether VEED is right for you, the good news is that you can get started for free. Try out the tool and see if it's a good fit before committing to one of the paid plans. And if you do decide to upgrade, you'll unlock even more exciting features!
.png)
.png)


